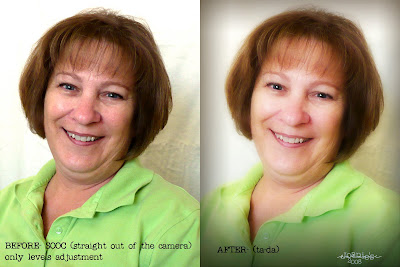
As promised, I took some time this morning before going to pick up Camille and her friend, Alissa, at the airport to take a photo of my new grown-out hair. But am I just going to slam it up here without playing around with it in PhotoShop first? (This is where I hear a resounding *NO*!!!)
I went to Jessica's website to search for some of her digital goodness (she really is the goddess of Photoshop!). I used several of her techniques.
These are the steps I used.
- Open photo in PSE6 and adjust color and saturation levels.
- Applied the PSF (PhotoShop Friday) on photo sha-ZAM. (overlay @42%, screen @47%)
- Used the eyes-pop technique, also a PSF. [A little erasing here too since I have squinty eyes ;) ]
- Used the technique learned in Digi-in-Deep Lesson 3 to fake a depth of field and blur the background. (It goes something like this as I remember... Jessica's instructions are much better, but, there you are!) Using the magnetic lasso tool draw around person.
Ctrl +J to put it on its own layer.
Select background layer, apply Gaussian blur set @ 23
Go back to the background layer and soften edges using eraser tool and a soft edge brush set at 35% opacity. - Finally I added a vignette from KeepDesigning.com and changed the color to a brown and the opacity to 83%.


2 comments:
Cool PS tricks! I really need to get the links you have to cool vignettes and stuff like that. I'm such a "baby" to all this compared to you.
Love,
Cindy
this came out really great, I love the softened look! With my deep lines, I should try that one for sure! I am too lazy to read all those PS tuts, it's so much easier to read your short version. Keep them coming. I forgot most of the stuff we learned already, have to dig out my papers!
Post a Comment