1. Start by opening a new PSE document in the size you'd like your frame to be, in my case I want it to fit a 6"x 6" photo. (A word to the wise, save frequently during this process so you are backed up;)
2. Select your rounded rectangle tool. Then click and drag your shape. I like to have a 1/4" border. You can turn on your grids here (View- grids) to help you get the correct size. If you don't get it exactly right on the first try, don't sweat it. You can stretch or shrink it to fit.
3. Right click on the shape layer you just created and choose simplify layer from the fly-out menu.
4. Choose your eraser tool and load a corner rounding brush. Position the corner brush over the corner of the shape and erase by clicking down once. It helps to zoom in for this step.
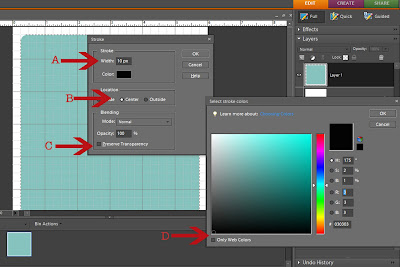
6. Create a new layer above your shape layer. Then choose:
A- Stroke width- 10px,
B- Location- Center,
C- Make sure your Preserve Transparency box is UN-checked
D- choose black for your color. Click OK
Then click ctrl-D to deselect the dotted line.

(click image to make it larger)
You have created your frame. Click on the eye by the shape layer to turn it off (you can delete it later.
7. Now for the fun part... you get to personalize it. Create a new layer and load the desired brush. I used KPertiet_LedgerGrids brush for the lower right corner to add interest to the frame.
Create a new layer, position your brush and click down once. If you want more than one brush put each brush on its own layer. That way you can move them around or delete them if you change your mind.
8. Choose your desired fonts to add text. (I used Problem Secretary and CK Cursive as my fonts ). Again, put each word or number on a new layer. Rotate the text and drag it to your desired locations.
9. Select your rectangular marquee tool and draw a selection around the date area. Make sure your frame layer is selected and press delete. Repeat for the signature area.
10. OK... almost finished! You'll want to delete your shape layer and rename the background layer to "DISCARD THIS LAYER" (you may need to change the background to a layer first). I like to keep my frame in layers so that I can easily change the date (since this is for my Project 365). I just open this file, choose all of the layers except "DISCARD THIS LAYER" and ctrl-drag to my edited photo. Be sure to save this in a place where you can find it easily. Remember that you can use this frame as a jumping off spot for another version.
WHEW!! I hope that this little tutorial has been a help to you. Let me know if you have any questions.
I will tell you that writing tutorials is NOT for the faint of heart! LOL! (Started at 2:50 pm- finished 6:21pm)


3 comments:
Oh my gosh Joanie, I would have never asked you to do this!!!!! Way too much work for you but I sure appreciate it. I will have to go through it and figure it out for PS. I saved it into a document for later. Love it!!
One of these days, you & I will have to have a HANDS-ON tutorial. I am not just visual, I have to be shown when I don't know what's going on. Thanks for sharing, Joanie!
Anke, it was my pleasure to do this. I've never written a tut before so it was a learning experience for me. I had fun doing something new and, hopefully, will get better at it as I go along.
Hugs,
Joanie
Post a Comment